Braided Easter Basket

I go a little nuts at holidays. With baking, that is. It’s all those lovely pictures from my magazines and cookbooks that show everything I would love to have on my holiday table. I have a friend who calls this obsession “holiday hopes and dreams” but I think she is referring to her kids. Strangely, I still have a collection of those.

I saw this loaf and thought it was so pretty, while also being not very sweet, a good addition for someone who likes to go a little overboard on the breads and candies. It’s a charming centerpiece and an easy bake, and rewardingly simple. The recipe comes from Recipes from the Old Mill: Baking with Whole Grains.

You can also see the multiplicity of bakes here: I couldn’t stop with just the Braid! I actually also made cupcakes and cookies, too. And distributed many of them. My additional holiday hope and dream is to cover the house in Cadbury Mini Eggs. I mean, it’s just once a year.

Braided Easter Basket

2 1/4 t. yeast
3/4 c. warm water
1/4 c. sugar
3 T. instant dry milk
1/4 c. oil or butter
1 t. salt
1 egg
1 c. whole wheat flour
2-2 1/2 c. flour

Dissolve yeast in warm water. Let set for 5 minutes. Add sugar, dry milk, oil or butter, salt, egg, and whole wheat flour. Add enough flour to make a soft dough.

On floured surface, knead 8-10 minutes, till smooth and elastic. Place in greased bowl, turning once to grease surface. Cover. Let rise in warm place till double, about 1 hour.

Punch down. Divide in thirds. Cover. Let rest 10 minutes. Shape 1/3 of dough in 6 “eggs.” Place close together in the center of greased baking sheet. For nest, shape remaining dough in two 26″ ropes. Twist together. Coil around “eggs.” Seal ends. Cover. Let rise till double, about 45-60 minutes.

Bake at 375 degree for 15-20 minutes.

Frost the braid with confectioner’s sugar icing (powdered sugar, a little milk, and vanilla or orange zest for a little more flavor), starting with the “eggs.” As soon as iced, sprinkle with candy decorations. Glaze the coiled nest. Sprinkle with coconut that has been tinted green with a few drops of green food coloring.

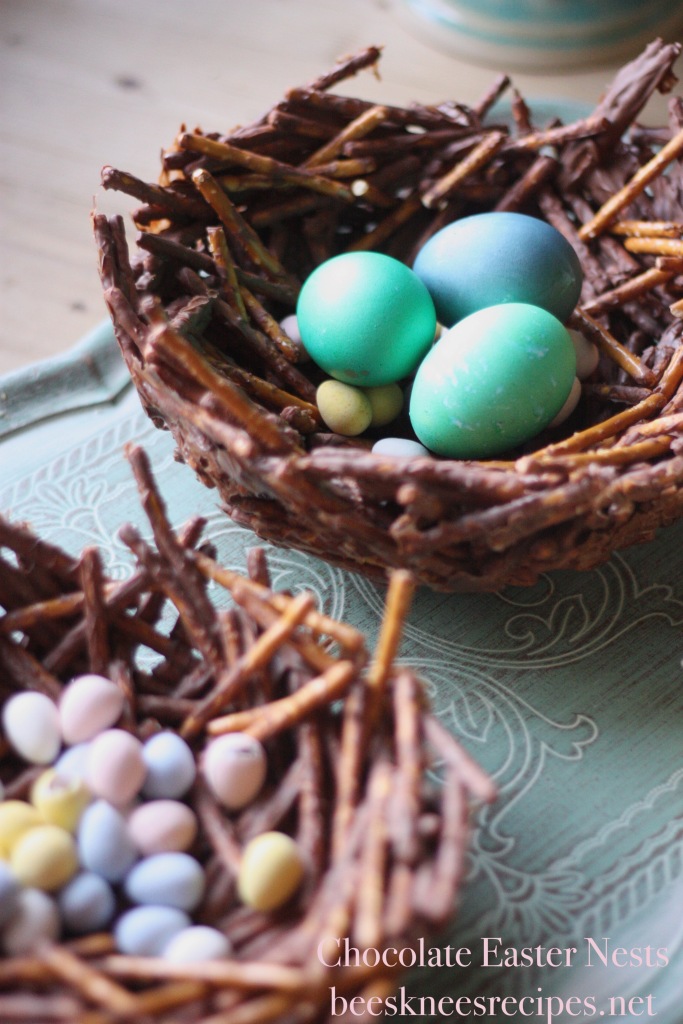
Chocolate Easter Nests

I’ve been so in love with this idea since I first saw it two years ago. It has probably already circled the internet a few times, but if you haven’t, by chance, seen it, I would say this might be the one Easter idea that is worth doing, especially if you are short on time. In fact, I am thinking of having these be my kids’ Easter baskets this year–small, simple, beautiful, and ready to fill with a few candies and eggs.

This recipe comes from Alice Medrich, who I think is incredible, and I originally saw it on Food52. I used to do a lot of candy making at Easter–caramel and peanut butter eggs, molded chocolates, homemade Peep-type things, but now I really just do this and some breads. It’s the right amount. And again, so pretty.

Chocolate Easter Nests

  • 4 ounces (115 grams) dark chocolate or 6 ounces (170 grams) milk chocolate, chopped [I ended up adjusting a little according to the look, too]
  • 4 to 6 cups thin salted pretzel sticks (such as Snyder’s of Hanover)
  • Equipment: Two-quart stainless steel bowl to use as a mold
  1. To prepare the mold, press a sheet of plastic wrap across the bottom and up the sides of the bowl, as smoothly as possible and with as few air bubbles as possible, letting the ends hang over the bowl. If necessary, press another sheet into the bowl crosswise to cover any bare sides of the bowl. Tip: If you wipe the bowl with a damp sponge or cloth, it will help to adhere the plastic a little better, but be sure that chocolate never comes in contact with a moist surface. And no, foil is not better for lining the mold!
  2. Put the chocolate in another (clean, dry) medium stainless steel bowl. Bring about an inch of water to a simmer in a wide skillet. For dark chocolate, set the bowl directly in the water and adjust the heat so that the water is not quite simmering. For milk chocolate, turn the heat off under the skillet and wait 60 seconds before setting the bowl of chocolate in the water. [If you’re familiar with melting chocolate in the microwave, it’s also very doable and easy. Just microwave only in 30 second segments, stirring between each turn. It doesn’t take long and requires attention not to scorch, but it can be easier.]
  3. Stir the chocolate frequently with a clean, dry spatula until the it’s melted and smooth. Remove the bowl from the water and let the chocolate cool to lukewarm, (about 90° F–this will temper the chocolate relatively well, too, so you don’t have white streaks). Pour about 4 cups of the pretzels into the chocolate. Use a rubber spatula to turn the pretzels gently in the chocolate until they are completely coated; add more pretzels if you can, as long as you can get them coated. It’s okay if some of the pretzel shows through the chocolate, but they should be coated and the chocolate should still be sticky. Continue to turn the chocolate-coated pretzels in the bowl until the chocolate seems a little thicker and cooler, but not yet starting to set.
  4. Use your fingers to arrange the pretzels in the bottom and up the sides of the lined mold.
  5. Refrigerate to set the chocolate. To unmold, lift the plastic liner out of the bowl. Set the basket down on a serving platter and peel the plastic gently away from the pretzels. Serve filled with chocolate truffles, stemmed strawberries, or other treats.

Crazy Good Falafel

I haven’t made falafel in years, because I just knew my kids would turn their noses up at it, but then we had a great experience at a Shawarma cafe while we were abroad last summer, and suddenly they were open to it. Okay, I think they were more into the chicken than the falafel, but at least they tried it (and I remembered that they liked it. They contested that when they saw these on the table.) At any rate, I had thought we had turned a new leaf and I was delighted. So, with the little extra time I can devote to actually soaking beans and the like, I pulled out my old recipe, rearing up to make it, when I thought to compare it to a new recipe from Bowls of Plenty from Carolynn Carreno. This new recipe was very similar to my old favorite, but included sparkling water, and knowing how much better tempura and onion rings are with sparkling water, I thought it was genius. And, it is. So, here’s crazy good falafel for you. So good, in fact, my fourteen-year-old not only requested it for her birthday, but also for dinner every night of the week. Enjoy.

Crazy Good Falafel

FOR THE FALAFEL
½ lb. (1 cup) dried chickpeas, soaked overnight and drained
½ small Spanish yellow onion, coarsely chopped
4 garlic cloves
¼ c. fresh parsley
2 T. fresh cilantro
1 T. kosher salt, plus more as needed
½ t. ground cumin
½ t. ground coriander
¼ t. freshly ground black pepper
1⁄8 t. ground cardamom (optional; if you have it, use it)
½ c. sparkling mineral water
½ t. baking soda
2 to 3 c. canola oil (or another neutral- flavored oil), or as needed, for frying [I used peanut oil and thought it was quite delicious!]

1) To prepare the falafel, combine the chickpeas, onion, garlic, parsley, cilantro, salt, cumin, coriander, pepper and cardamom (if you’re using it) in a food processor and pulse until the chickpeas are finely ground. Turn the mixture out into a bowl and stir in the mineral water and baking soda. Cover the bowl and refrigerate for 1 hour to soften the ground chickpeas.

2) Pour 3 to 4 inches of canola oil into a small saucepan. Fasten a candy or deep-fry thermometer to the side of the saucepan or drop in an unpopped kernel of popcorn into the oil. Heat the oil over medium-high heat until the thermometer registers 350° F or the kernel pops. Remove the popcorn kernel if you used it. (I learned this trick from the venerable cooking magazine Cooks Illustrated, a great magazine if you want to learn to be a better or more knowledgeable cook.)

3) While the oil is heating, give the falafel mixture a good stir and scoop it into 1-ounce (2-tablespoon) portions; roll into balls, and put the balls on a baking sheet or plate. The mixture is very wet and can be awkward to work with; the moisture is what makes the falafels as light as they are. Carefully drop the balls in the oil, adding only as many as will fit in a single layer, and fry them for 1 to 2 minutes, until they are golden brown and crispy, turning them as they cook so they brown evenly. Using a slotted spoon or strainer, transfer the falafel to paper towels to drain, and sprinkle with salt. Fry the rest of the falafel. Enjoy with hummus, cut veggies, or in a pita. I loved adding some pomegranate seeds as well!

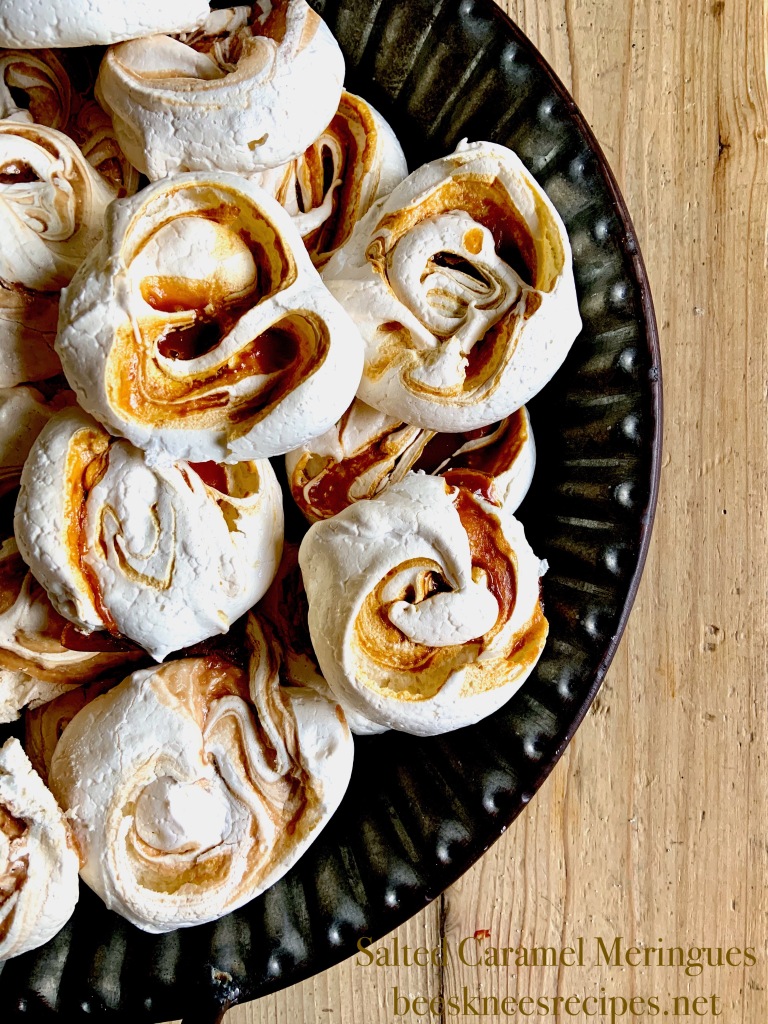
Salted Caramel Meringues

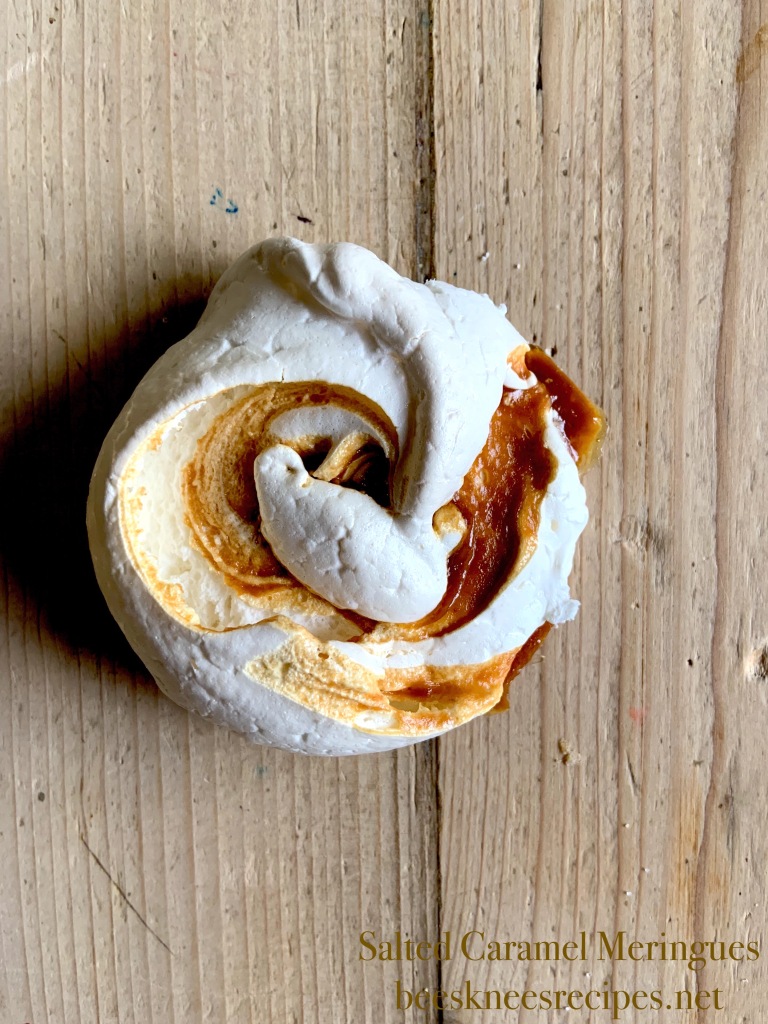
This is the recipe that popped out at me when I opened Erin McDowell’s The Fearless Baker. This book is full of fun and beautiful recipes, and I have already made a couple, but this one is a good one for a few pantry staples (especially if you happen to have salted caramel sitting in your fridge–which luckily, I did), so it might inspire those of us who are rather homebound.

My main alteration for next time would be to play with the baking times. I’ve liked baking meringues hot and fast rather than low and long (doesn’t that sound very 21st C.?) because I’m not a great ahead-of-time thinker and I’ve had terrific luck with it (like my Christmas Dream Drops), but I did as the recipe suggested here and went for low and long. It didn’t work great–I probably pulled the pans too soon, and the meringues collapsed. They tasted great and were still pretty, but I will go longer next time, or go fast and hot. Haven’t decided yet. In the meantime, I hope you enjoy these beautiful little cookies! My twelve-year-old is already asking for them again . . .

Salted Caramel Meringues

4 large egg whites
1/4 t. cream of tartar
1 c. granulated sugar
1/2 t. vanilla extract
1/4 t. fine sea salt
1 c. Salted Caramel Sauce

Preheat the oven to 325. Line two baking sheets with parchment.

In the bowl of a stand mixer fitted with the whisk attachment (or in a large bowl with a hand mixer), whip the egg whites and cream of tartar on medium speed until lightly foamy. Raise the mixer speed to high and add the sugar in a slow, steady stream. Continue whipping until the meringue holds medium peaks, 5-7 minutes. Add the vanilla and salt and mix to combine, about 1 minute.

Gently scoop the meringue onto the prepared sheets using a scoop or two spoons to create 1/4 c. dollops, leaving 1 1/2 inches between each. Use a small offset spatula to slightly flatten the mounds, keeping them circular. [I didn’t flatten them, but I did depress a mound in the center and then filled it with the sauce, and then swirled.]

Drizzle 2 teaspoons of the caramel sauce over each meringue (you can transfer the caramel to a disposable pastry bag to do this, or just use a spoon), then use the tip of a paring knife to gently swirl them together, keeping the swirl to one or two wide strokes (the more you swirl the more likely the meringues will deflate).

Transfer the meringues to the oven, lower the oven temperature to 250 and bake until the meringues are very dry to the touch (the caramel will melt slightly into the cookies.) How long this takes depends on how dry the weather is–anywhere between 45-90 minutes [aim for the longer–I live in a dry desert climate, and it wasn’t fully done at 60 min.]. When the meringues are dry, turn off the oven and leave the sheets in the oven until the cookies and sheets cool completely.

Salted Caramel Sauce

1 1/2 c. sugar
1/4 c. corn syrup
1/4 c. water
1 t. vanilla extract
4 oz. unsalted butter, cut into cubes, at room temperature
1/2 c. heavy cream
3/4 t. fine sea salt

Note: I think this is a particularly well written caramel recipe! If you’re a newcomer to caramel, the author explains the process very well.

Combine the sugar, corn syrup and water in a medium saucepan. Bring to a boil over medium-high heat. You can stir the mixture before it boils to help dissolve the sugar, but stop stirring the moment it starts. Boil the syrup until it’s a medium amber color. Once it starts to color, tilt the pan occasionally–it’s easier to see the true color of the caramel when you’re looking at less of it (or it may seem darker than it really is). As soon as it’s close to medium amber, turn off the heat–the caramel will retain some heat, so it’s good to allow for carryover cooking.

Add the butter to the caramel and stir gently to combine. Stir in the cream (be careful–the caramel may bubble up and steam a lot. Just keep stirring and it will die down). The sauce should be smooth and creamy. If it seizes up and you see lumps of caramel that haven’t fully dissolved in the sauce, return the pan to low heat and stir occasionally, until the sauce is smooth. Stir in the salt and vanilla. Remove from heat and cool.

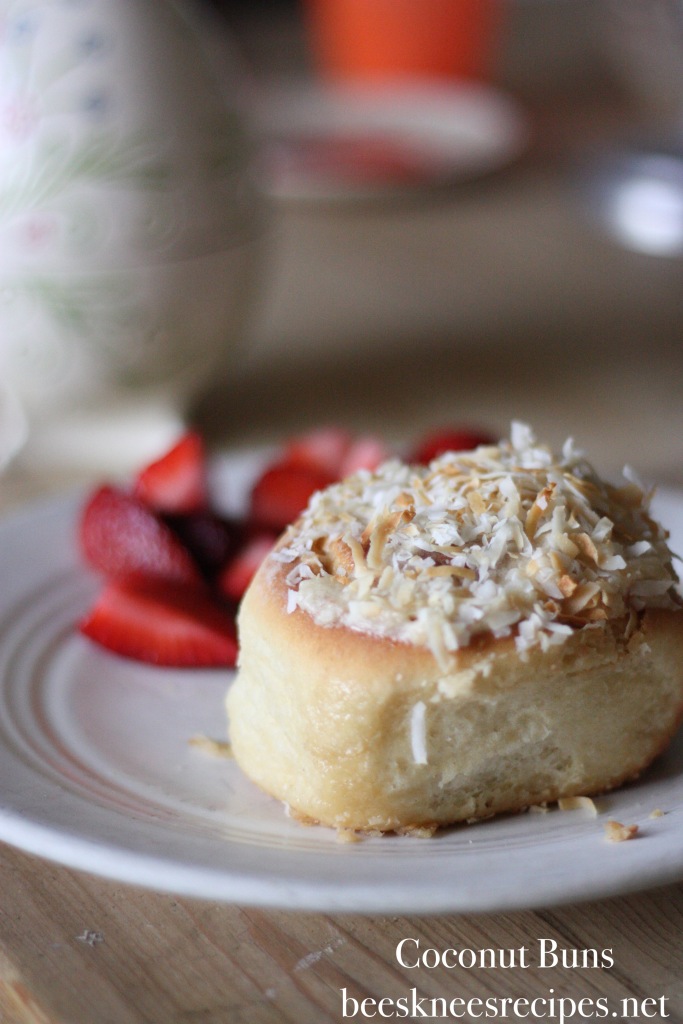
Coconut Buns

I do a lot of practical baking, but then I sometimes see these recipes that are purely for pleasure and they look so enticing, and I’m so curious about how they will turn out that I can’t shake it out of my head until I make it. This is one of those. I was collecting recipes for a class I was teaching when I came across it, and I had never heard or thought of this idea–a cinnamon bun with a coconut mixture. But it sounded so great, and really, after making it, it was so great. So, here’s a fun way to spend a weekend morning if you find yourself being a little homebound lately! I found the recipe in a Bake Magazine from Spring 2018.

Coconut Buns 
Makes 12
Recipe by Ben Mims

  • 1¼ c. (300 grams) warm unsweetened canned coconut milk (120°F/48°C to 130°F/54°C)
  • ⅓ c. (67 grams) granulated sugar
  • 2 T. (28 grams) unrefined coconut oil, melted
  • 1 t. (3 grams) kosher salt
  • 1 large egg (50 grams), lightly beaten
  • 4 c. (500 grams) all-purpose flour (I replaced 1 1/2 c. with whole wheat)
  • 1 (0.25-ounce) package (7 grams) instant yeast (2 1/4 t.)
  • ½ c. (25 grams) unsweetened coconut flakes
  • Coconut Filling (recipe follows)
  • Coconut Icing (recipe follows)
  1. In the bowl of a stand mixer fitted with the dough hook attachment, combine warm coconut milk, sugar, melted coconut oil, salt, and egg. Add flour and yeast, and beat at low speed until a dough forms. Increase mixer speed to medium, and knead until smooth, about 8 minutes. Cover with plastic wrap, and let rise in a warm, draft-free place (75°F/24°C) until doubled in size, about 1½ hours.
  2. Preheat oven to 350°F (180°C). Spread coconut flakes on a baking sheet, and bake, stirring halfway through, until lightly golden brown, about 8 minutes. Transfer coconut to a bowl, and let cool completely. Lightly grease a 13×9-inch baking pan with butter.
  3. Transfer dough to a lightly floured surface. Roll into an 18×12-inch rectangle. Spread Coconut Filling over dough, leaving a ½-inch border on one long side. Starting with opposite long side, roll dough into a tight log. Trim ends, and cut into 12 rounds. Transfer rounds, cut side up, to prepared pan, and cover with plastic wrap. Refrigerate for at least 8 hours or overnight (or let rolls rise at room temperature for 1½ hours).
  4. Preheat oven to 375°F (190°C).
  5. Uncover rolls, and bake until puffed and golden brown throughout, about 35 minutes. Let cool for 10 minutes. Drizzle with Coconut Icing while still warm, and sprinkle with toasted coconut flakes before serving.

Coconut Filling

  • 1 c. (84 grams) finely shredded dried (desiccated) coconut
  • 1 c. (227 grams) unsalted butter, softened
  • ½ c. (110 grams) firmly packed light brown sugar
  • 3 c. (360 grams) confectioners’ sugar, sifted
  • 1 t. (4 grams) coconut extract
  • 1 t. (4 grams) vanilla extract
  • ½ t. (1.5 grams) kosher salt
  1. Preheat oven to 350°F (180°C). Spread coconut on a baking sheet, and bake, stirring halfway through, until lightly golden brown, about 8 minutes. Transfer to a bowl, and let cool completely.
  2. In the bowl of a stand mixer fitted with the paddle attachment, beat butter and brown sugar at medium speed until smooth, about 2 minutes. Add confectioners’ sugar, extracts, and salt; beat until smooth. Reserve ½ cup filling for Coconut Icing. Stir toasted coconut into remaining filling. Cover with plastic wrap until ready to use.

Coconut Icing

  • ½ cup Coconut Filling (recipe precedes)
  • 2 tablespoons (30 grams) unsweetened canned coconut milk
  1. In a small bowl, stir together Coconut Filling and coconut milk. Cover with plastic wrap until ready to use.

Old Mill Bread

A beautiful everyday loaf that slices amazingly for sandwiches.

I have made so many everyday loaves over the years. I have a collection of favorites, and yet since I make them so frequently, I still look for new ones to add to my cache. This recipe comes from one of my favorite wholesome baking books, Recipes from the Old Mill by Sarah E. Myers and Mary Beth Lind. Despite having tried close to half of the recipes before, I somehow had never noticed this one, which reads “This is my favorite bread, the one I always come back to.” How did I miss that? I always want to try a baker’s favorite go-to bread! So, I pioneered it last week, and I think my husband mentioned three times, while cutting it one morning, what a fan he was. So, now it’s part of the honored collection.

Old Mill Bread

2 c. boiling water
1/2 c. cornmeal
1/4 c. honey
2 t. salt
2 packages dry yeast (2- 2 1/4 t.)
1/2 c. warm water
1/4 c. oil
1/2 rye flour
1-2 c. whole wheat flour
3-4 c. flour

Mix together boiling water, cornmeal, honey, and salt. Cool to lukewarm. Meanwhile, dissolve yeast in warm water.

Once the cornmeal mixture is lukewarm, add the oil and the yeast. Mix well, then add the rye and wheat flour. Continue to add the water flour until you have a soft, but not dry, dough.

Knead by hand for 10 minutes, or in a standing mixer for 5-6 minutes at level 4. Once well kneaded, place the dough into a greased bowl and let rise until doubled, about one hour.

Punch down and divide into three parts (for the picture, I divided the dough into just two sections, to make two extra large loaves, instead of three). Taking one amount at a time, flatten into a rectangle (about 12 in. by 8 in. with the short side facing you) and then tightly roll to make a loaf, tucking the dough into the sides as you roll if it starts to balloon out. Place into greased bread pan and shape the remaining two dough balls.

Let rise again for 45-60 min. Twenty minutes before baking, heat the oven to 375 degrees. Bake for 35-45 minutes (until 190 degrees). Immediately turn the loaves out onto a cooling rack once done, to prevent the loaf from getting soggy.

Cinnamon Raisin Variation: After the first rise, once you have created a rectangle, sprinkle the dough with brown sugar, raisins, and cinnamon, and roll in a similar fashion to before.

Pilgrim’s Bread

Of course, these have to be paired with Crescent Rolls–I’ll have to post the recipe later–or my kids might revolt.

When I came across this recipe in the Farm Journal’s Homemade Breads book last year, it seemed like an absolute no-brainer for Thanksgiving dinner. I reworked it a little. I made the dough into rolls rather than a loaf, and added a bit more water and molasses. Then, to show off the whole grains inside, I sprinkled seeds on the top. I was super happy. I don’t know that guests really even eat the bread at Thanksgiving dinner, after being saturated with potatoes and the like, but the rolls are always the best the next day when you get to stuff bits of turkey and cranberry sauce in them. And what’s really great on Friday is that all the work is done.

Pigrim’s Bread

2 1/4 c. water (might need up to 1/4 c. more)
1/3 c. honey
3 T. molasses
2/3 c. corn meal
1/4 c. vegetable oil
1 c. stirred whole-wheat flour
1 c. stirred rye flour
2 packages dry yeast (4 1/2 t.)
2 t. sugar
1/2 c. warm water
2 1/2 t. salt
3 1/4 – 4 1/4 c. all-purpose flour
3 T. mixed seeds (sesame, pumpkin, chia) to sprinkle
1 egg white, mixed with 1 t. water and lightly beaten

In a 2-qt. saucepan over high heat, bring 2 1/4 c. water, honey, and molasses to a boil. Reduce heat to medium. With wire whisk, gradually beat in corn meal until smooth. Cook, stirring constantly, until mixture boils and thickens, and 1 minute. Remove from heat. Stir in oil. Let stand to cool until warm (105-115 degrees).

In a small bowl, stir together the whole wheat and rye flours.

In a large bowl of a standing mixer, sprinkle the yeast and sugar over 1/2 c. warm water; stir until dissolved. Add salt, corn meal mixture, 1/2 c. whole wheat flour mixture and 1 c. all-purpose flour. Using mixer at low speed, beat until well blended. Increase speed to medium; beat 2 minutes.

Stir in remaining whole wheat flour mixture and enough additional all-purpose flour to make a soft dough. Turn it out onto a lightly floured surface. Knead until smooth and elastic, about 15 minutes. Place in a large, greased bowl and let rise 1 hour.

Punch down. Divide into 18 pieces. Shape each roll (I did knots–long snake and then tie) and place on a baking sheet. Rise again for 45 minutes.

Preheat oven to 375 degrees. After the second rise, brush with a beaten egg white, and then sprinkle with seeds. Bake for 15-18 minutes, or until the rolls are golden brown. Remove to a wire rack and let cool.

My cute daughter holding the basket of goods.

Besides Pumpkin

I was flipping through several cookbooks yesterday, looking for pie inspiration, but was feeling a little uninspired. Yes, pumpkin. Yes, banana cream. But what else? I looked at Martha, Chang, Poliafito and Lewis, Ko, Beranbaum, Parks, Tosi, all my usuals, but I wasn’t feeling it. Today, when I asked my kids for their thoughts, they announced they wanted all the old reliables. The ones I make every year. And, I’m actually great with that. Funny enough, they’re also all on my blog and have been for years. So, just to share some tried, true, and remarkable old reliables, here’s a list of what I’m making this year.

This is the pear custard which I’m holding in my hands and taking a picture with my old cell phone, so it looks rather unsightly. I hope it doesn’t dissuade. It’s actually super easy and delicious.

Lemon Chess Pie (my favorite, by far)

Southern Praline Pecan Pie (okay, this one might be my favorite, by far)

Pear Custard Pie (this is definitely my son’s favorite. And sometimes mine too)

Rosemary Apple Pie (sometimes I decide this is too much work, because I guess chopping rosemary just sends my brain a little over the edge, but then I’m happy I bit the bullet)

I may add another one to the lineup, like I usually do, but if so, it will be after these are baked. The extras are to leave at home, so that we don’t return from our large family dinner completely empty-handed. As much as I love bringing the pies, I always also want a slice for breakfast on Friday morning.

Hopefully this can stir the inspiration around. Happy Thanksgiving!

Roasted Peach Cobbler with Berries

I’m just happily working through many new cookbooks, and I couldn’t wait to make this peach cobbler before peaches were out of season. We actually had a fair amount of peaches off our own tree that we planted six years ago (we should have more, but it’s had quite the history, this tree!), but I didn’t quite get to making this before we’d eaten them all, so luckily peaches are still plenty available at farm stands and stores.

I have cobblers that I like and even love, but this one definitely adds to the collection, so I’m recording it. It tasted so good, I thought, I would rather eat this than pie. And that is saying something.

This recipe comes from Food and Wine, so if you want the original, follow this link. This variation includes my own innovation of strawberries and raspberries, and I doubled the cobbler to make a bigger amount. I’m wanting to remember this, so I can make it again and again and again.

Roasted Peach Cobbler

  • 8 large ripe peaches (4 pounds), peeled and cut into 1/2-inch-thick wedges
  • 4 c. fresh or frozen strawberries (slightly defrosted if frozen)
  • 1 c. fresh or frozen raspberries (slightly defrosted if frozen)
  • 3 T.  light brown sugar
  • 1  c. all-purpose flour
  • 1/2 c. granulated sugar
  • 1/2 t. baking soda
  • 1/2 t. kosher salt
  • 8 T. cold unsalted butter, cut into small pieces
  • 2 large egg yolks
  • 1 t. pure vanilla extract
  • 1 T. fresh lemon juice
  • 1 pint vanilla ice cream, for serving
  • 1 tablespoon balsamic syrup (I haven’t tried yet, but it sounds delicious!)

Preheat the broiler on high and position a rack about 6 inches from the heat. In a large bowl, toss the peaches with the brown sugar and scrape them onto a rimmed baking sheet. Broil the peaches for about 15 minutes, flipping them halfway through, until caramelized and juicy. Let the peaches cool slightly. Lower the oven temperature to 375°.

Meanwhile, in a large bowl, combine the flour, granulated sugar, baking soda and salt. Add the butter and, with your fingers, rub it into the mixture evenly. Stir in the egg yolks and vanilla. Refrigerate the crumb topping.

In a bowl, toss the cooled peaches with the lemon juice, and add strawberries and raspberries; divide among 12 8-ounce ramekins (or bake in a large 9x 13 pan for 35 minutes).  Sprinkle with the crumb topping and bake until the topping is golden and the fruit is bubbling, about 20 minutes. Let cool for 5 minutes, then serve with the vanilla ice cream and a drizzle of the balsamic syrup.

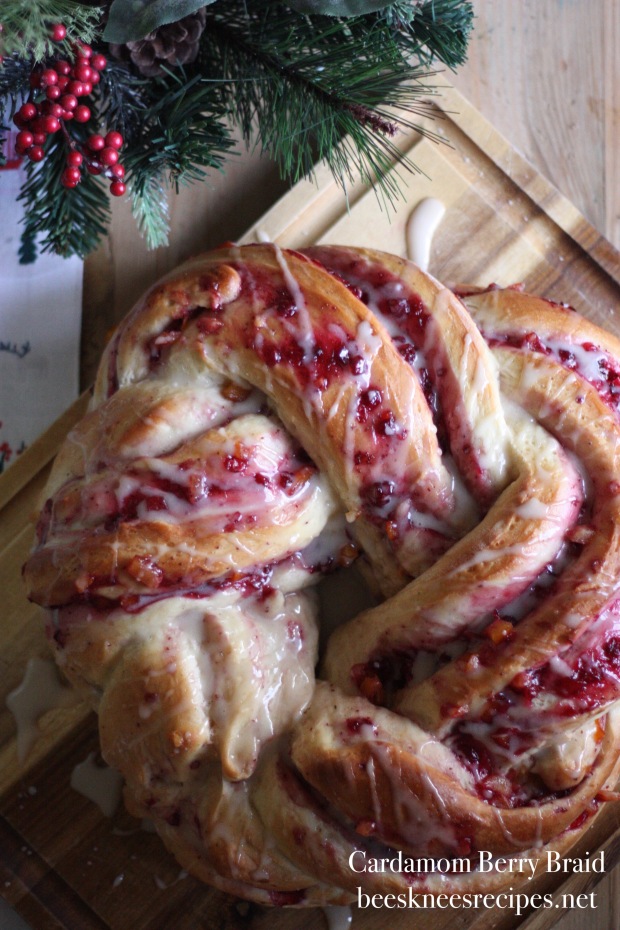
Cardamom Berry Braid

I pulled this recipe from last year’s Bake from Scratch, holiday edition, and I wanted to make it based solely on its appearance. It’s absolutely stunning. The original recipe calls for  a homemade cranberry filling, but going with the Scandinavian flavors here, I opened a bottle of nice lingonberry jam instead. I liked the flavors tremendously, and I liked saving myself a step, too. I really recommend following suit! I also made a big batch of candied orange peel for the Christmas season, so I used that as well, but if you aren’t inclined to make your own, a purchased one could also work, as could just the zest of an orange grated into the jam. I ended up serving this bread Christmas morning (I baked it a few days in advance, froze it, defrosted it overnight, and then warmed it the morning of Christmas in the oven). I loved this bread (I ate it over the Christmas Kringle we had), and I hope to make it for many years to come. It also got the distinguished title from my father-in-law as “the best thing you’ve ever made.” Has a nice sound to it, doesn’t it?

Cardamom Berry Braid

  • ¾ c. (180 grams) whole milk
  • ½ c. (100 grams) granulated sugar
  • ¼ c. (57 grams) unsalted butter, cubed and softened
  • 1½ t. (4.5 grams) kosher salt
  • ½ c. (120 grams) warm water (105°F/40°C to 110°F/43°C)
  • 1 T. (6 grams) instant yeast
  • 2 large eggs (100 grams)
  • 5½ c. (688 grams) all-purpose flour
  • 1 t. (2 grams) ground cardamom
  • Lingonberry Jam or Cranberry Filling (recipe below)
  • Storebought or Homemade Candied Orange Peel, diced
  • Vanilla Glaze (recipe below)
  1. In a small saucepan, bring milk to a boil over medium heat. Remove from heat; add sugar, butter, and salt, stirring until completely incorporated. Set aside until cooled to 120°F (49°C) to 130°F (54°C).
  2. In the bowl of a stand mixer fitted with the dough hook attachment, combine ½ cup (120 grams) warm water and yeast. Add warm milk mixture. Stir in eggs. With mixer on low speed, add flour and cardamom, beating until combined. Increase mixer speed to medium-low, and beat until smooth and elastic, 5 to 7 minutes. Spray a large bowl with cooking spray. Place dough in bowl, turning to grease top. Cover directly with plastic wrap, and let rise in a warm, draft-free place (75°F/24°C) until doubled in size, about 1 hour.
  3. Line a large baking sheet with parchment paper.
  4. On a lightly floured surface, roll dough into a 24×12-inch rectangle. Spread Lingonberry Jam onto dough, leaving a ½-inch border on all sides. Sprinkle with diced Candied Orange Peel. Starting at one long side, roll up dough, jelly roll style; press edge to seal. Place on prepared pan.
  5. Using a serrated knife, cut roll in half lengthwise. With cut sides facing up, carefully twist dough pieces around each other. Form into a circle, pinching ends to seal. Cover loosely with plastic wrap, and let stand in a warm, draft-free place (75°F/24°C) for 30 minutes.
  6. Preheat oven to 350°F (180°C).
  7. Bake until golden brown and internal temperature registers 190°F (88°C), about 40 minutes. Let cool completely on a wire rack. Drizzle with Vanilla Glaze. Store in an airtight container at room temperature for up to 4 days.

Cranberry Filling (optional)

  • 1⅓ c. (171 grams) dried cranberries
  • ⅓ c. (67 grams) granulated sugar
  • 1 T. (14 grams) unsalted butter, cubed
  • ½ t. (1 gram) ground cardamom
  • ¼ t. ground cinnamon
  1. In a small saucepan, bring cranberries and water to cover by 1 inch to a boil over high heat. Reduce heat to low, and cook until cranberries are softened, about 20 minutes. Drain cranberries, reserving 2 tablespoons (30 grams) cooking liquid.
  2. In the work bowl of a food processor, place warm cranberries, reserved 2 tablespoons (30 grams) cooking liquid, sugar, butter, cardamom, and cinnamon; pulse until mixture has the texture of jam. Let cool completely. Refrigerate in an airtight container for up to 1 week.

Vanilla Glaze

  • 1 c. (120 grams) confectioners’ sugar, sifted
  • ¼ c. (60 grams) heavy whipping cream
  • 1 t. (4 grams) vanilla extract
  • ½ t. (1.5 grams) kosher salt
  1. In a small bowl, whisk together all ingredients until smooth. Use immediately.